
Once your listing has been photographed and your photographer has uploaded your photos to your Mediamax Virtual Tour, you don’t have to leave it at that. There’s plenty of customizing you can do to make sure your listing shows online just the way you want it.
For instance, maybe your listing has a beautiful dining room that you want buyers to see first. Or maybe you’d like the stunning backyard to be featured right after the front main. You know best what to put the spotlight on and how to lead buyers through the home so they can’t wait to book a showing.
Here’s how to arrange photos in your Mediamax Virtual Tour – and by the way this goes for any “media” in your tour, including panoramas and videos.
Step 1: Click on the tour you want to edit in your My Tours window.
Step 2: Click on the Edit Tour icon in the Tools window.
Step 3: Notice that the Edit Tour window always opens to the Media Tab. You can click on any tab from here but this is where you want to be to arrange your photos and other media.
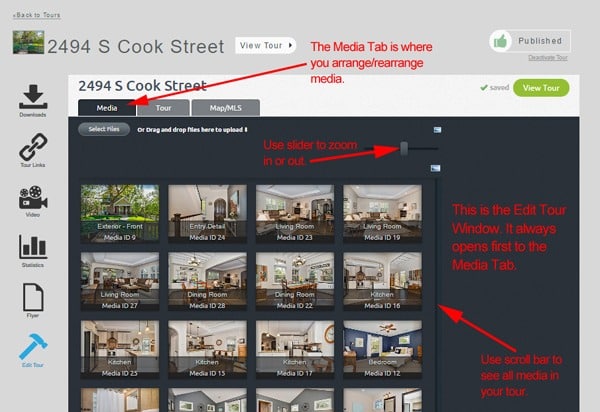
Your photos appear as thumbnails. Depending on the size of your screen, all your photos may not be visible at once, so use the scroll bar to scroll up and down.
You can also use the slider to zoom in to get a closer look.
Or zoom out to see everything at once.
Step 4: To move a photo from one place to another, find it by scrolling or zooming as needed. In this case, I want to rearrange the Master Bedroom photos, so I’m going to move one of them.
First click and hold the photo you want to move. Notice the click highlights it in blue. Then, drag and drop it where you want it to go. In this case, I wanted the photo I’ve selected to come first, so I dragged-and-dropped it to the left over the other one.
You can see that the photo I selected (still highlighted) is now in a new position. The other photo moved over to accommodate it.
Keep in mind, you can move any photo wherever you want it in the tour, not just “next door” as I’ve done. Just Click, Hold, Drag and Drop.
Step 5: You can also move multiple photos at a time and it works almost the same way. You just have to make use of the Shift key.
First, hold down the Shift key and Click on the photos you want to move to select them. In this case, I’ve selected three at once. Then, let go of the Shift key and drag and drop the group where you want it.
Note: this can take a little practice. Keep in mind, the photos show here in rows and columns but that’s not how they show in your tour, so don’t let that bog you down. Also, you can certainly move multiple photos and then rearrange them individually as needed.
That’s all there is to it. Arrange and rearrange photos, panoramas and virtual tours in any of your tours whenever you need to. It’s a simple way to give your tours your unique touch.
Schedule a personalized “How to Use Mediamax Virtual Tours” presentation for your office. I’ll go over everything you need to get the most out of your tours. Call my direct line at (303) 988-6809.